Friday 16 October 2015

My River Island Sale Haul

Ever since I started shopping in RI it has been one of my favourite clothes shops, and their sales were always a time of huge excitement for me! When their sale started this week, the fact that I was going away for a few days at the weekend didn't stop me pulling out my visa!! My delivery just arrived in work, so I thought I'd do a quick blogpost on my haul during my lunch break!

I found these two gorgeous dresses for going-out both reduced from €60 to €24. The black dress is a jersey material with a raised print, sheer waist band and a crop top that can be removed to reveal a cami top. Two dresses in one basically! I have to admit, a friend of mine has this dress and I was so in love with it that I had to buy it when I saw it! Ssssh, don't tell her!! ;) With the party season as they call it approaching you really can't be without a black dress! The pink dress is gorgeous; I love the colour, the feel and how light it is. I also love the ruched detail across the front which will be perfect for hiding any lumps and bumps!!


I was a small bit disappointed with my next purchase, which I suppose is the downfall to shopping online! I got this really cute pink knitted jumper with pearl and diamante embellishments reduced to €24, but unfortunately it's made from that awful itchy wool!! I love it too much to send it back though so I'll e keeping this one for the coldest months and wear it with a long sleeved tee to stop the itchiness!


I was a bit adventurous with this 2 in 1 wool and pleather bodycon dress (also reduced to €24) as I have big hips and I was afraid it would drag across them, but luckily it's actually gorgeous! The pleather part is actually a dress and the wool crop top opens at the back to reveal the gold zip. Both materials are so soft as well so the dress is a lot comfier than it looks!


My absolute favourite buy was this shearling waistcoat reduced from €100 to €35. This type of waistcoat is extremely popular at the moment and the block fabrics mean this looks cosy and classy. It's really comfortable and flattering as it cinches in at the waist and ends at the mid-thigh. I think these are fantastic for layering and I can't wait to wear it! 


Happy Friday everyone! Niamh xxx

Wednesday 14 October 2015

Recipe: Red Pepper, Sweet Potato and Chickpea Frittata

It was a chilly Friday evening with the prospect of a cosy night in in front of the telly and a fire when suddenly, hunger struck!! I went to the fridge to find it practically bare...the devastation!! Again, here I am being dramatic :) but this is really the way I feel about food, and I know I'm not alone in this!! So, what to do? Order takeaway or get creative with what was left of the week's groceries? I'm going to Portugal for a short break in a week so I decided to get creative mainly because I wanted to keep my money and also because I wanted to eat something I wouldn't be regretting next week when I'm walking around in my Summer clothes again! Now, bear in mind that I do my groceries on Saturday mornings and usually eat out or get a takeaway on friday night so there really was very little left to work with. Also, I'm really not creative...but I tried my best!

The result: a red pepper, sweet potato and chickpea frittata.

The verdict: unbelievably tasty...frittastic even!! (apologies for the terrible joke!)

Here is the recipe for this amazing frittata, and, as always, I hope you enjoy it!! :)

Ingredients

1 tin of chickpeas
1 sweet potato
1 red bell pepper
1 clove of garlic 
4 eggs
4 egg whites
Feta cheese
1 tsp cumin
1 tsp paprika
Salt and Pepper


Method

Preheat the oven to 220deg Celsius. Chop and fry the sweet potato and red pepper for approximately 10 minutes until they start to soften. 


When the vegetables are soft, drain and rinse the chickpeas and add to the pan. 


Whisk the eggs, egg whites, garlic, cumin, paprika (and a splash of milk if you want) together in a bowl, then add to the pan. Season and put into the oven for 15-20 minutes. You can top your frittat with some feta and spinach, like I did, if you wish!


Then sit back and relax, and be really surprised at how tasty this simple dish is!! 


Niamh xxx

Wednesday 7 October 2015

Recipe: Fry-Up Breakfast Cups

These mornings I find I'm rushing out the door, bag hanging off my elbow, travel mug clutched desperately in my hand and an apple shoved in my mouth while I struggle with my bunch of keys to lock the front door.....it's all very dramatic really!! I'm fairly certain that I'm not the only one who ends up rushing in the mornings because bed is just too comfy!! After getting dressed and brushing your teeth, breakfast should be a top priority in the mornings, especially if you are following a heavy-weights training programme. Even if you are not though, protein as part of your breakfast is a fantastic way to help you feel full while you start your day. I made these "fry-up breakfast cups" at the start of the week and they are amazing!! I pop two of them in the microwave for 60s and I don't feel hungry again until lunchtime! I have posted the recipe below and I hope you enjoy them! These are fantastic as a quick and easy breakfast or as a post-training snack.

Ingredients

Frylite or any low cal cooking spray
12 rashers or 12 bacon medallions (1 per bun so it depends on how many you want to make)
4 gluten free sausages or 4 turkey sausages (turkey sausages are not gluten free)
2/3 of a bottle of O'egg liquid egg whites
1 handful of spinach
Pepper

Instead of eggs I used the O'Egg egg whites. I had seen them in the supermarket and on instagram but never used them before. They are fantastic in this recipe as there's no egg shells and no whisking eggs; you just pour them straight from the bottle into the bun tin. They are naturally fat free, low in calories and high in protein. As well as that, this is an Irish food brand and the only ingredient is egg whites!


1 bun contains approximately 100 calories, 5.4g fat (1.6g saturated), 1.8g carbohydrates (0.6g sugar), 0.1g fibre, 9g protein

Method

  1. Preheat the oven to 180degC.
  2. Spray a bun or muffin tin with the low cal cooking spray so that the buns can be easily removed when they are cooked.
  3. Trim the fat from the rashers and use one per bun. Try to make a cup out of the rasher so that the egg will stay inside.
  4. Cut each sausage into six pieces and put two small pieces into each bun.
  5. Pour the egg whites into each bun.
  6. Cover each bun with black pepper and some chopped spinach. 
  7. Put in the oven for approximately 20 minutes.


They don't look very pretty but they taste amazing!! The buns will keep in the fridge for 3-4 days when stored in an airtight container. Hope you enjoy them as much as I did!

Niamh xxx

Tuesday 6 October 2015

Hotel Room Mini Workouts

I was in Berlin recently for a week to present at a conference. I've been really lucky while doing my PhD to have had the opportunity to go to three conferences in different countries; the first was in Copenhagen, the second in Tampere (Finland) and the third was in Berlin. I really enjoyed the conference and I got a few days to see the city as well which was fantastic! There was one aspect of going away for work that I was a little worried about and that was absolutely undoing any improvements I had made in terms of diet and fitness while I was away. When I went to Berlin, I had only been trying to get into a routine of exercising and eating right for about 3 or 4 weeks so I knew that if I was going to spend the week eating what I wanted and doing no exercise it would be really difficult to get back into the swing of things when I came home! After all, this wasn't a holiday, it was for work.

I can imagine that it must be difficult to maintain a healthy diet and regular exercise when you have to travel for work so I have decided to post about the workouts I would do in my hotel room whenever I got a spare 20-30 minutes to make sure I stayed focused. I found it very hard to find time to exercise while I was away so my aim was to pack as much into as little time as possible so that any exercise I did do was short but effective. I have included them here as images; if you plan to travel soon and you don't want to put your workouts on hold, I hope that you find this post helpful!! They are also a fantastic addition to finish a workout session, even if you aren't travelling. For any arm workouts that require weights just buy two 2l bottles of water; you can use them as weights and to stay hydrated!

I have given an approximate time for each workout. I used to do to 50-40-30-20-10 workout before I had a shower and I think that's a routine I'm going to try to keep!


Tabata is a very short high-intensity workout so it is ideal when you are stuck for time. Depending on how much time you have you can either pick two or four exercises and repeat each set of a pair of exercises four times.


AMRAP - As many rounds as possible is like a Crossfit workout. Try beat your score every day you are away! You can increase or decrease the time limit depending on how much time you have to exercise.


In this mini workout you have to complete each exercise as fast as possible...it's in the name really! Another great one for the competitive people!!


I absolutely hate this one! It is so tough, but you really do feel the benefit from it. I have included legs, arms and abs versions in the image.


The circuit training workout is fantastic if you have about 30 minutes to spare. It is quite tough but a very effective 30 minute full-body workout.


Set your timer and every time it passes the minute mark perform 10 reps of each exercise.


I hope you find these mini workouts effective! I'd love to hear if you try them!

Niamh xxx


Saturday 26 September 2015

Recipe: Spicy Sweet Potato and Coconut Soup

I absolutely love the weather we are having at the moment; sunny, but cool enough that you have to wear all those lovely autumn jackets, boots and jumpers. We officially had to turn the heating back on in the house again in the evenings and in my mind, that means it's time to start making soup again!

I am a big fan of soup, but I rarely order it in a restaurant or buy it ready made as you never know what's in it and it could be loaded with salt, cream or oil. So it's a good thing that soup is so easy to make at home yourself and requires only a chopping board, one pot and a hand blender. I'm sure there are tons of different ways to make soup, but I have my way that I apply to any type of ingredients and I always end up with a thick and tasty soup that's perfect to warm yourself up in the evenings. I'd heard about sweet potato and coconut soup before, and I thought it sounded amazing! I've never actually tried it before now, so making it today was a little bit of a gamble! I decided to make it on a whim and I really had no clue if it would be nice, especially as I made up the ingredients and the recipe (something I'm not great at)! However, I'm glad to say it was delicious and definitely worth posting about! Here is my recipe for spicy sweet potato and coconut soup, I hope you like it! 

Ingredients

1 medium onion
2 cloves of garlic
1 tin of coconut milk
1 large sweet potato
1 tbsp coconut oil
2 tsp ginger
2 tsp cumin
1 tsp chili
1 tsp turmeric
Salt and Pepper


Makes 4 servings
1 Serving contains approximately 254 calories, 18.6 g fat (16.2 g saturated), 20.2 g carbohydrates (6.3 g sugar), 2.9 g fibre, 2.9 g protein

Method

  1. Heat the coconut oil in a large pan with a heavy base and fry the onion and garlic for approx. 5 minutes.
  2. Roughly chop the sweet potato into cubes, add to the pot and fry for a further 5 minutes.
  3. Add the ginger, chili, cumin, turmeric and coconut oil. Fill the empty tin of coconut oil with water and add this to the pot too.
  4. Bring to the boil, season and leave to simmer for around 20 minutes.
  5. Using the hand blender, blitz the soup until it is smooth.
The soup can be kept in the fridge in an air-tight container for 2-3 days.


I hope you enjoy this soup if you try it!

Niamh xxx

Wednesday 23 September 2015

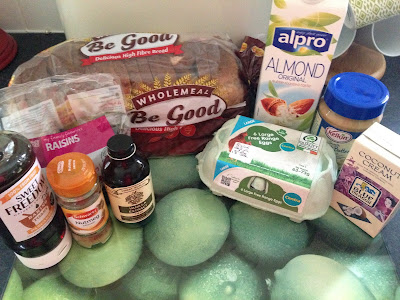
Recipe: Healthy Bread and Butter Pudding

I recently watched “The Hundred Foot Journey”, a movie about an Indian family who set up an Indian restaurant directly across the road from a French Michelin star restaurant in a small French village. It’s a good movie – funny, light hearted and feel-good and Helen Mirren is in it, I love her! 

One of the quotes from the movie is “food is memories”. I couldn’t agree more with this!! I learned to cook from my two grandmothers and my mother, though I’m still nowhere near as good as them! One of my grandmothers died three years ago and there is one dish especially that always reminds me of her. My grandmother had rheumatoid arthritis; it’s a type of arthritis that seriously affects your hands (as well as the rest of your body of course). Despite all this, she was tough and a true lady! When I was young, she taught me how to make bread and butter pudding. It was the first time I tried it and I loved it! Most people can take or leave this dessert but it’s one of my favourite comfort foods!  When I was in school and in college studying for exams, she would prepare the bread and butter pudding and drop it to our house so that I could put it in the oven and have it fresh! She always put cinnamon and nutmeg on top so the smell in the kitchen would literally make your mouth water. It always meant so much that she would think to do this for me.  

At the moment, I’m writing my PhD thesis while also working as a research assistant, so I am really feeling the “exam-time” pressure and getting cravings for comfort food. I want my body and brain working at their best so I can get all this work done, so I decided to substitute the ingredients from my grandmother’s recipe with healthy alternatives. Give it a try; it's really good and full of memories! <3

Ingredients


Saturday 5 September 2015

Recipe: A Healthy Option to Stop Those Pizza Cravings

Until recently, the weekend meant at least one pizza for me. I have a serious pizza addiction, pepperoni, always! So this weekend, while enjoying a relaxing night in after a difficult week of trying to adapt to a new way of eating, the pizza cravings hit me hard! I was absolutely determined not to give in, so I decided not only to save myself the bloating and sick feeling I get after a pizza, but to also save myself the money of ordering one in. I had a few things left in the fridge after the week that I wanted to use up instead of wasting them and I improvised this recipe. I really didn't think this was going to turn out as amazing as it was, but lets face it...if it has melted cheese, it's most likely good! 

I really enjoyed this, it was delicious, easy to make and I feel great after it! I made a carb free version using aubergine slices as the base, but if you aren't a fan of aubergine (like my fussy eater of a boyfriend) you can use a wholemeal wrap as the base instead. He loved this and even agreed that the sauce was "sauce-some"!!! I apologise, but I love terrible puns!! But to be fair, the sauce is amazing. The recipe makes enough sauce for two servings of pizza and you can put the rest in a jar and keep it in the fridge to use as a pasta sauce later in the week. I'm treating this as a little "cheat" as I don't think I should be eating melted cheese every day!! If you try it, I hope you enjoy it :)